To get started, you will need to do the following steps:
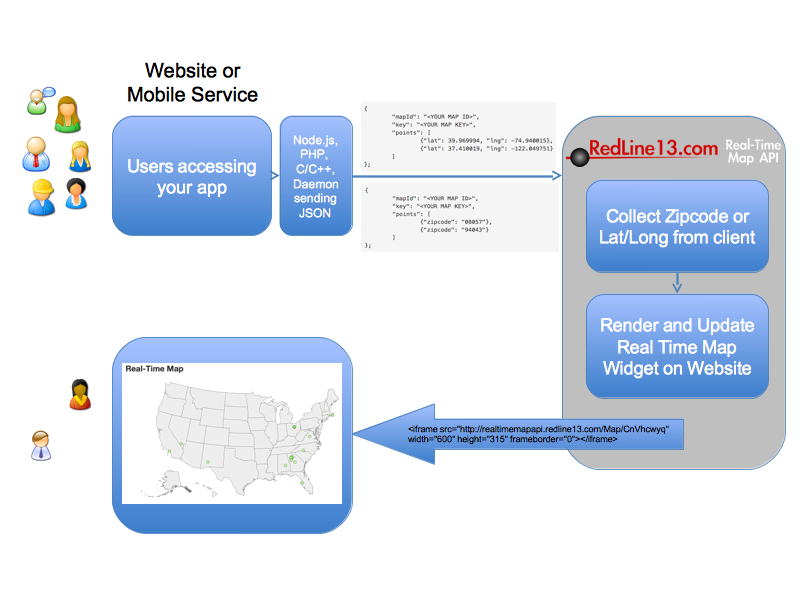
The graphic below shows the system architecture and how data flows from your website or mobile service to our API and finally to the end-users viewing the map.
We offer client libraries in PHP, Node.js, and C/C++.
We highly encourage you to use our server daemon by downloading it here. This includes a 32-bit and 64-bit version of a daemon that runs on a Linux server. Please contact us at with any questions.
redline13-mapapi-daemon-install.sh./etc/redline13-mapapi-server/redline13_mapapi_server.ini with you map ID and key.sudo service redline13-mapapi-daemon start.
The PHP client has built in support.
Simply supply /tmp/redline13_mapapi_server_socket as the $serverUnixSocketFilename parameter to the RealTimeMapApi constructor.
You can also use the daemon with Node.js or any other language.
All you need to do is pass the JSON encoded string for a single point to the /tmp/redline13_mapapi_server_socket UNIX socket.
On success, you should receive the response OK.
An API request is an HTTP POST request to https://realtimemapapi.com:4434/ telling us what points to draw on the map.
The data is a JSON encoded message in the following format below.
You can specify a variable number of points.
The latitude and longitude are in degress.
{
	"mapId": "<YOUR MAP ID>",
	"key": "<YOUR MAP KEY>",
	"points": [
		{"lat": 39.969994, "lng": -74.940015},
		{"lat": 37.410019, "lng": -122.049751}
	]
};
Alternatively, you can specify a zip code instead of latitude and longitudes. An example of this is below.
{
	"mapId": "<YOUR MAP ID>",
	"key": "<YOUR MAP KEY>",
	"points": [
		{"zipcode": "08057"},
		{"zipcode": "94043"}
	]
};
With each point, you can provide the following additional keys.
| Key | Value |
|---|---|
r |
The radius of the point to be drawn in pixels. This must be a number (i.e. no quotes around it). |
c |
The HEX color (format: "#000000") of the point to be drawn. |
c2 |
The HEX color (format: "#000000") to transition to as the point grows on the map. |
delay |
The delay in milliseconds before this point is displayed. The delay cannot be more than 30 seconds (30000ms). |
visible_time |
The amount of time in milliseconds that point is displayed (excludes additional fade in and fade out time). The time cannot be more than 30 seconds (30000ms). |